Form of ITR 1 for FY 19-20 notified, read FAQs
Table of Contents
- All you need to know about ITR 1for FY 19-20 also called ITR Sahaj
- Who should file ITR-1for FY 19-20
- Details Required to file ITR-1 Online: –
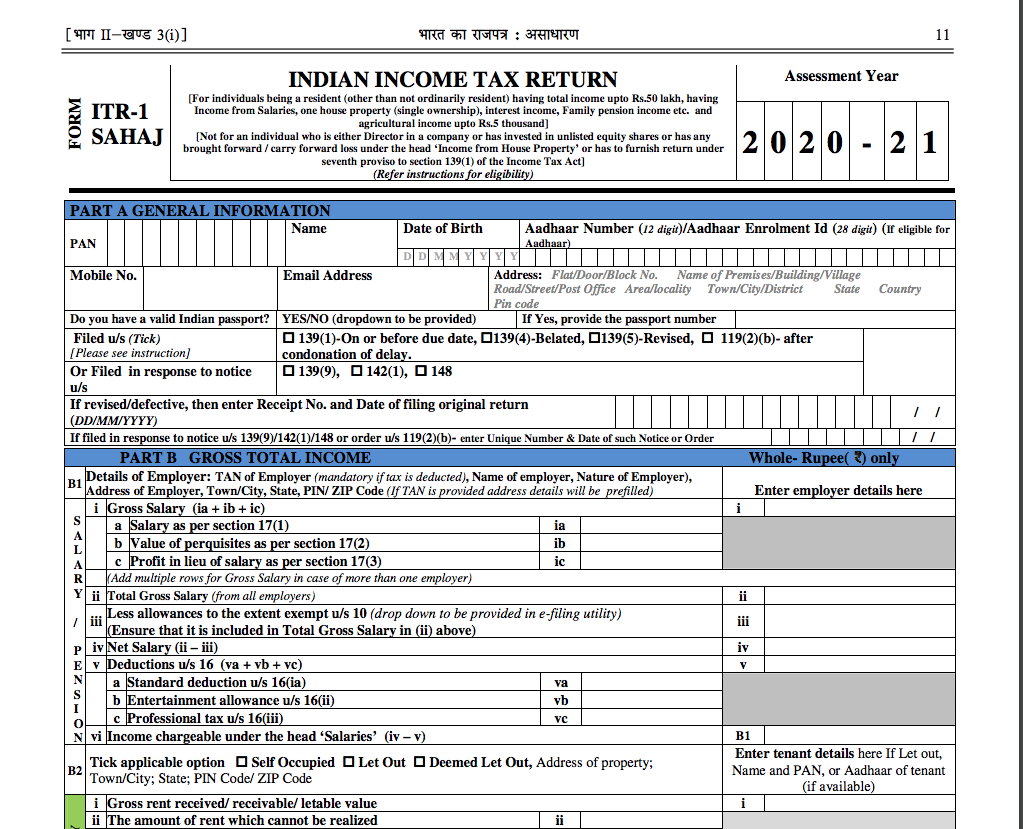
- Part-A (General Information)
- Part-B (Gross Total Income Section)
- Part C – Deductions and Taxable Total Income Section
- Part D – Computation of Tax Payable Section
- Download the copy:
- Download the copy of ITR 1 for FY 19-20 as notified
All you need to know about ITR 1for FY 19-20 also called ITR Sahaj
It is time to file the ITR of the current AY. Forms are available on the income tax website. In this article, we have covered the ITR 1 for FY 19-20. ITR 1 is also called ITR Sahaj. It is a basic income tax return. It is applicable to salaried taxpayers. Taxpayers with housing income and interest income can also file it.
Who should file ITR-1for FY 19-20
- Only Residents can file ITR-1
- ITR-1 form should only be filed by individuals having an income of up to Rs. 50 lakhs
- Income can be from:
- Salary/ Pension; or
- One House Property (excluding cases where there is brought forward loss or loss to be carried forward from the previous year); or
- Other Sources such as interest from Bank Account (excluding winning from lottery and income from Race Horses, Income taxable under section 115BBDA or Income of nature referred to in section 115BBE)
Note 1: – Further, in a case where the income of another person like spouse, minor child, etc. is to be clubbed with the income of the assessee, this Return Form can be used only if the income being clubbed falls into the above income categories.
Details Required to file ITR-1 Online: –
Mandatory Requirement:
- PAN
- Form-16 issued by your employer
- Form 26AS from TRACES
- Aadhaar Number/Aadhaar Enrolment ID
Step to file your ITR-1: –
Step1- Go to Website: www.incometaxindiaefiling.gov.in
STEP 2: On the Home Page:
- If you are a registered user, Click on “Login Here”
- If you have not registered, click on “Register Yourself” -+ Complete the Registration and then log in
STEP 3: You will be taken to Login Page:
- Enter “User ID” (PAN)
- Enter”Password”
- Enter “Captcha” (Captcha is case sensitive)
- You can also request an OTP instead of Captcha if you are visually challenged
- Click on “Login”
STEP 4: In your Dashboard:
Click on “Income Tax Return” Option under e-File menu
STEP 5: On Income Tax Return Page:
- Your PAN will be auto-populated
- Select “Assessment Year” as 2020 to 21
- Now Select ITR form Name” as ITR-1
- Select “Submission Mode” as prepare and submit online. (You can also submit using Upload XML option. XML can be generated using the offline Excel or Java utilities. Utilities can be downloaded in the e-Filing portal under Downloads Offline Utilities Income Tax Return preparation utilities)
- In case of Prepare and submit online mode below pre-fill option will be shown additionally
- Your Personal details (such as PAN, Name, and Date of birth) will be prefilled as per the PAN database. Contact details (such as Address, Mobile Number and email ID) will be prefilled from e-Filing profile and the Tax Details will be prefilled from Form 26AS
- Select the pre-fill option for other Fields/Schedule as required from the latest filed ITR
- You can select and e-Verify your return using any one of the below options or You can e-Verify later or send the signed ITR-V to CPC
- e-Verify options will appear as below
- Digital Signature Certificate – If you have Registered your DSC in e-Filing Portal
- Aadhaar OTP – If Aadhaar is linked with PAN
- EVC using Pre-Validated Bank Account – If EVC enabled pre-validated bank account present for the PAN
- EVC using Pre-validated DEMAT Account – If pre-validated DEMAT account present for the PAN
- Already generated EVC through My Account Generate EVC option or Bank ATM
- Click on “Continue” (In case of Upload XML option, you can select the XML generated using the browse option and submit along with the E-Verification option selected such as DSC/ Aadhaar OTP/EVC as selected and complete the filing process)
STEP 6:
- Read all the given instructions carefully before proceeding
- Click Next (The Arrow)
STEP 7: You will be taken to “Part A General Information” tab
- PAN, Last Name, Date of birth, Email ID, Mobile Number and Address pre-filled according to PAN database and e-filing profile, you can modify/update these details if required. Enter your details, if it is not prefilled
- Select “Employer Category” from the following options:
- Government
- Public Sector unit
- Others
- Not Applicable
- Select “Type of Return” whether it is Original/Revised. In case of a Revised return, please provide the receipt number of Original return and Date of filing of Original Return
- Select “Return Filed” type, which is appropriate to you:
- 11 – Voluntarily on or before the due date under section 139(1)
- 12 – Voluntarily after the due date under section 139(4)
- 13 – In response to notice under section 142(1)
- 14 – In response to notice under section 148
- 15 – In response to notice under section 153A
- 16 – In response to notice under section 153C read
- under 153A
- 17 – Revised return under section 139(5)
- 18 – In response to a notice (u/s 139(9)) where the original return filed was the defective return
- 20 Section 139(4) read with section 119(2) (b)
- Click “Save Draft”
- Click Next
Part-A (General Information)
![Word templet [Compatibility Mode] - Word 2020-04-0 1](https://www.consultease.com/wp-content/uploads/2020/04/Word-templet-Compatibility-Mode-Word-2020-04-0-1.png)
STEP 8: – You will be taken to “Computation of Income and Tax” tab
Part-B (Gross Total Income Section)
- Fill in Details, where applicable
- Salary, Type of house property and Income from other sources will be prefilled, if it was selected in prefill option earlier. You can modify/update these details if required
- B1 – Fill in the details of Salary/Pension as given in Form 16 provided by your employer
- B2 – Select type of house property as “Self Occupied” or “Let Out” and Fill in all the details of your House property
- (B2 v) Maximum loss from house property that can be set off is ₹2 lakhs
- B3 – If you have Income from other sources enter the amount, If you have incurred loss, please use ITR 2
- B4 – “Gross Total Income” (B1+B2+B3) (if the loss, put the figure in negative) It will be auto-populated as per the details entered
Part-B (Gross Total Income Section)
![Word templet [Compatibility Mode] - Word 2020-04-0 2](https://www.consultease.com/wp-content/uploads/2020/04/Word-templet-Compatibility-Mode-Word-2020-04-0-2.png)
Part C – Deductions and Taxable Total Income Section
Enter all the Applicable Deductions
- 80C – Enter the amount paid or deposited towards life insurance, contribution to Provident Fund set up by the Government, recognized Provident Fund, contribution by the assessee to an approved superannuation fund, subscription to National Savings Certificates, tuition fees, payment/repayment for purposes of purchase or construction of a residential house and many other investments
- 80CCC – Enter the amount paid towards Payment in respect of pension fund
- 80CCD(1), 80CCD(1B), 80CCD(2) – Enter the amounts that are contribution to pension scheme of Central Government
- Maximum amount of deduction for 80C + 80CCC + 80CCD(1) is ₹1,50,000/-
- The maximum amount of deduction for 80CCD(1B) is ₹50,000/- and for 80CCD(2) is 10% of the salary
- 80D – Enter the amount paid towards Health Insurance Premium in 80D(A), Medical Expenditure in 80D(B) and Preventive health check-up in 80D(C) – Maximum amount of deduction applicable
- for 80D is ₹60,000/- (Depends on the Normal, Senior, Super Senior Citizen status)
- Enter the amount paid towards maintenance including medical treatment of dependent who is a person with a disability in 80DD, Medical treatment for specific disease in 80DDB
- Enter the amount towards interest on loan taken for higher education in 80E and interest on loan taken for residential house property 80EE
- Enter the amount towards Rent paid in 80GG
- Enter the amount towards Royalty on patents in 80RRB and Royalty income of authors on certain books in 80QQB
- 80G – If you have entered details of donations in 80G schedule, those details will auto-populated here
- Enter the amount you gave as a donation for scientific research or rural development in 80GGA and donation to a political party in 80GGC
- 80TTA – Enter income from interest on deposits in a savings account – Maximum amount of deduction applicable is ₹10,000/- (This Deduction would be allowed only if income is filled in B3- Income from other sources)
- Enter the amount in 80U by selecting the appropriate option
- C1 – “Total Deductions” will be auto-populated as per details entered
- C2 – “Total Income” (“Gross Total Income” less “Total Deductions”) will be auto-populated as per details entered
![Word templet [Compatibility Mode] - Word 2020-04-0 3](https://www.consultease.com/wp-content/uploads/2020/04/Word-templet-Compatibility-Mode-Word-2020-04-0-3.png)
Part D – Computation of Tax Payable Section
D1 to D11 are Auto-populated
- D1- Tax payable on Total income (C2)
- D2 – You can claim Rebate u/s 87A if your total Income less deductions are equal to or less than ₹3,50,000. The rebate is limited to ₹2,500
- D3 – Tax After Rebate (D1- D2)
- D4 – Education cess including secondary and higher education cess on D3
- D5 – Total Tax and Cess (D3+D4)
- Enter relief if any, allowable under section 89(1) (Ensure to submit form 10E)
- D7 – Failure to file return within the prescribed time limit will attract interest under u/s 234A
- D8 – People who default in payment of advanced tax and if their tax liability exceeds ₹10,000 in a financial year they will attract Interest u/s 234B
- D9 – Interest u/s 234C is levied if the advance tax paid in any installments is less than the prescribed amount
- D10 – Fee u/s 234F is levied in addition to section 234A for late filing
- Total interest and fee payable (D7+D8+D9+D10)
- D11 – Total Tax, Fee and Interest (D5+D7+D8+D9+D10-D6)
- Click “Save Draft”
- Click Next
Part D – Computation of Tax Payable Section
![Word templet [Compatibility Mode] - Word 2020-04-0 4](https://www.consultease.com/wp-content/uploads/2020/04/Word-templet-Compatibility-Mode-Word-2020-04-0-4.png)
Part E- Other Information Section
D15. Details of all Bank accounts held in India at any time during the previous year (Excluding dormant accounts)
- Bank Account in which refund, if any, shall be credited
- Enter Bank Account details for crediting refund (if any); it will be pre-filled if it was selected in pre-fill option earlier
- Kindly Double check the IFSC Code and the Account Number
- Other Bank Account details
- Add details of Bank account other than the primary account, if required
Part E- Other Information Section
![Word templet [Compatibility Mode] - Word 2020-04-0 5](https://www.consultease.com/wp-content/uploads/2020/04/Word-templet-Compatibility-Mode-Word-2020-04-0-5.png)
STEP 8. Sch-TDS 1, Sch-TDS 2, Sch- TDS 3 and Sch TCS– information is pre-filled as per Form 26AS and You can modify/update these details if required
- You can verify this using Form 26AS from TRACES
- You can Add/Delete TDS Information with “Add” or “Delete”
- Option Provided
- Sch IT-Details of Advance tax and Self-assessment tax
- If you have paid “Advance tax and Self-assessment tax”, information is pre-filled as per Form 26AS and You can modify/ update these details if required
- You can Add/Delete TDS Information with “Add” or “Delete”
- Option Provided Click “Save draft”
- Click Next
![Word templet [Compatibility Mode] - Word 2020-04-0 6](https://www.consultease.com/wp-content/uploads/2020/04/Word-templet-Compatibility-Mode-Word-2020-04-0-6.png)
STEP-9: –
Verification Section: –
All your Personal details are pre-filled from the PAN database. If not, enter the necessary details and Select Capacity as Self/Representative and Enter the Place
Click “Save Draft”
Click Next
![Word templet [Compatibility Mode] - Word 2020-04-0 7](https://www.consultease.com/wp-content/uploads/2020/04/Word-templet-Compatibility-Mode-Word-2020-04-0-7.png)
1.Digital Signature Certificate: –
If you have chosen DSC as your verification option, after clicking on Submit and ok, a dialog box will appear:
Click on “Click here to download the DSC Utility” Button to download the DSC Utility
- After Downloading, Unzip the DSC Utility, Open the Application and Click “Submit ITR/Form Online”
- Enter your e-Filing User ID (PAN)
- Enter PAN of the DSC which is Registered in e-Filing Choose the Type of DSC
- Click on “Browse DSC file” to Upload your DSC
- Enter the password for your private key
- Click “Generate Signature File” to generate your signature file
- Save your Signature file Exit your DSC Utility
- Go back to the e-Filing Portal – Submit Page
- Click “Choose File” to browse and Upload the Generated Signature File
- Click”Submit” to Complete the E-Verification Process
- Click “Back” to go back and make any required changes to the form
- Aadhaar OTP: –
If you have Chosen Aadhaar OTP as your Verification Mode, after clicking on Submit and ok, a dialog box will appear:
- Click on ‘I would like to generate Aadhaar OTP Now’
- Aadhaar OTP will be generated and sent to the mobile number registered with UIDAI. Enter the OTP in the box provided and click “Submit” to Complete the E-Verification Process
- The Aadhaar OTP is to be provided within the time period (For example within 60 seconds) else you will be prompted to proceed with the ITR submission and e-Verify later
- Click “Cancel” to go back and make any required changes to the form
- Electronic Verification Code: –
If you have Chosen EVC using Pre-Validated Bank Account Details /Pre-Validated Demat Account Details/Already generated EVC through My Account or Bank ATM as your Verification Mode, after clicking on Submit and ok, a dialog box will appear:
- Enter the Generated Electronic Verification Code (EVC) Received on your Registered Mobile Number
- Click “Submit” to Complete the E-Verification Process
- Click “Cancel” to go back and make any required changes to the form
STEP 10: –
- If you have e-Verified online using DSC, Aadhaar OTP or EVC options
- An Acknowledgement Page will be displayed after you complete your e-Filing process with your transaction ID
- Confirmation mail of completing your e-Filing will be sent to your registered e-mail ID
Your ITR has been Successfully Uploaded and e-Verified, your e-Filing Process is Complete
- If you have chosen “I would like to e-Verify later. please remind me” Option
- An Acknowledgement Page will be displayed after you submit your return with your transaction ID
- Confirmation mail of successfully uploading your ITR will be sent to your registered e-mail ID
- Your ITR has been Successfully Uploaded but e-Filing of ITR is not complete without Verification
- Click on the e-Verify link provided to verify your ITR online
- If you have chosen I don’t want to e-Verify Option
- An Acknowledgement Page will be displayed after you submit your return with your transaction ID
- Confirmation mail of successfully uploading your ITR will be sent to your registered e-mail ID
- If you have e-Verified online using DSC, Aadhaar OTP or EVC options
- An Acknowledgement Page will be displayed after you complete your e-Filing process with your transaction ID
- Confirmation mail of completing your e-Filing will be sent to your registered e-mail ID
- Your ITR has been Successfully Uploaded and e-Verified, your e-Filing Process is Complete
- If you have chosen “I would like to e-Verify later. please remind me” Option
- An Acknowledgement Page will be displayed after you submit your return with your transaction ID
- Confirmation mail of successfully uploading your ITR will be sent to your registered e-mail ID
- Your ITR has been Successfully Uploaded but e-Filing of ITR is not complete without Verification
- Click on the e-Verify link provided to verify your ITR online
- If you have chosen I don’t want to e-Verify Option
- An Acknowledgement Page will be displayed after you submit your return with your transaction ID
- Confirmation mail of successfully uploading your ITR will be sent to your registered e-mail ID
Download the copy:
Download the copy of ITR 1 for FY 19-20 as notified
This is the PDF of ITR 1 for FY 2019-20.
![Word templet [Compatibility Mode] - Word 2020-04-0](https://www.consultease.com/wp-content/uploads/2020/04/Word-templet-Compatibility-Mode-Word-2020-04-0.png)


