How to File Gstr 4 Online Step by Step Guide
How to File GSTR 4 Online Step by Step Guide
All the composition taxpayers must file GSTR 4 annually from FY 2019-2020 onwards. The return once filed cannot be revised, and also attracts a late fee if filed beyond the due date.
Related Topic: GSTR-4
A step-by-step guide to file GSTR 4
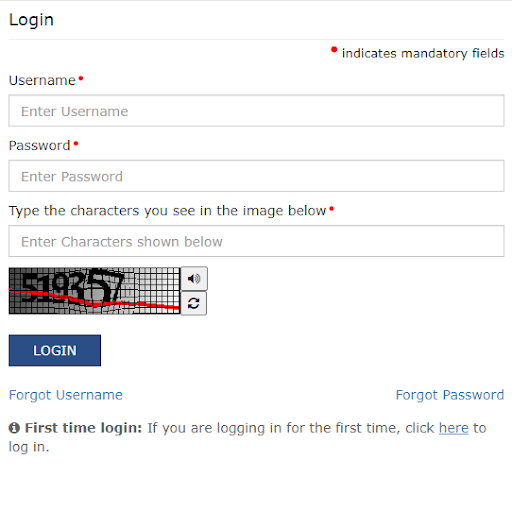
Step 1: Go to Gst.gov.in & click on Login

Step 2: Enter Username, Password & Captcha.
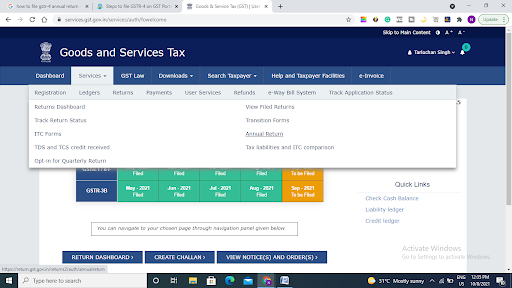
Step 3: Navigate to Services>Returns>” Annual Returns”
Step 4: Select the fiscal year that you would like to file the annual return from the drop-down list.

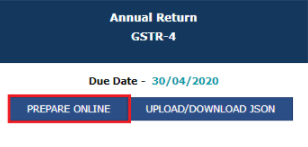
Step 5: Click on the PREPARE ONLINE button for filling Form GSTR-4
Step 6: Now the GSTR-4 Annual Return will display on-page. Here you will have to enter the aggregate turnover of Previous FY & Click Save
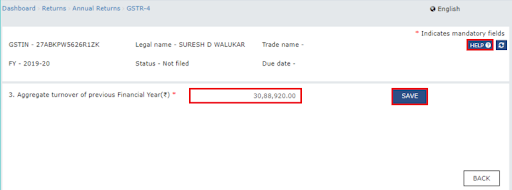
A save message will be displayed that “Save request has been acknowledged.”

Skip Step 7 if you are not filing a Nil GSTR-4.
Step 7: For filing Nil GSTR-4 Click on the checkbox to select ‘File Nil GSTR-4’ and click on ‘PROCEED TO FILE’. It takes you directly to step 7 and then step 9.
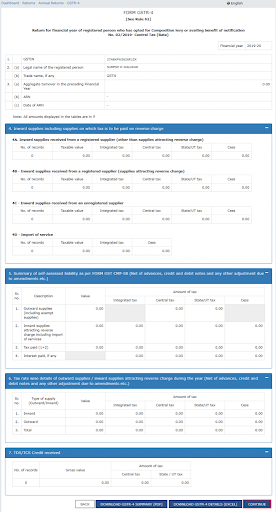

Step 8: Enter the details in various tables of GSTR-4 listed and explained below.
| 4A | Inward supplies from the registered supplier (other than reverse charge) | To add details of inward supplies received from a registered supplier (other than reverse charge) |
| 4B | Inward supplies from the registered supplier (reverse charge) | To add details of inward supplies received from a registered supplier (reverse charge) |
| 4C | Inward supplies from unregistered supplier | To add details of inward supplies received from an unregistered supplier |
| 4D | Import of Service | To add details of import of service |
| 5 | Summary of CMP-08 | To view auto-drafted details provided in filed Form CMP-08 for the financial year |
| 6 | Tax rate wise inward and outward supplies | To enter tax rate wise details of outward supplies during the financial year |
| 7 | TDS/TCS credit received | To view details related to TDS/TCS credit received |
Each time, you will have to select the particular table from the ‘Select tables to add/view det ails’ drop-down list to enter the details and click on the ‘BACK’ button.
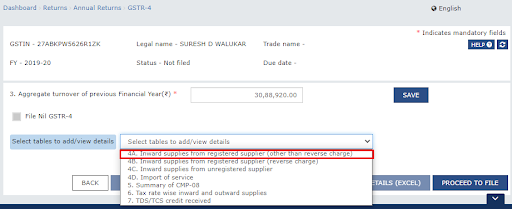
(a) Table 4A: Inward supplies from registered suppliers (other than reverse charge)–
Here you will have to enter GSTIN-wise details of inward supplies from GST registered suppliers.
- Add the GSTIN, then legal name and place of supply will auto-populates, and click on the Add (+) button for every entry.

Under the head ‘Item details’, enter the taxable value then choose the GST rate. These are mandatory cells.
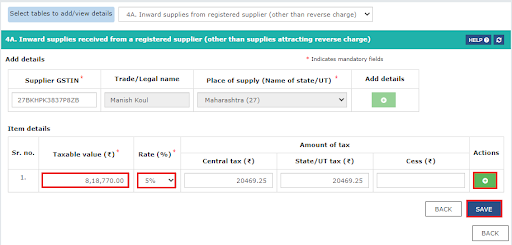
Click on the Add (+) button against the entry to add more rows or click on ‘SAVE’ to enter details with the next GSTIN.
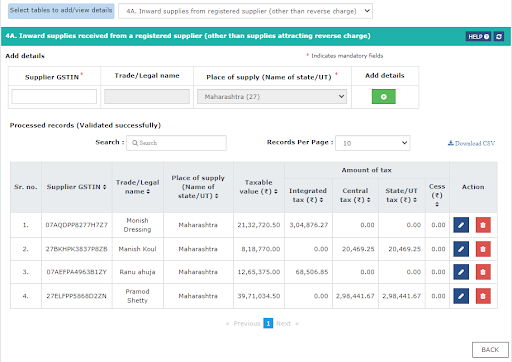
all the entries that are successfully added will be displayed in ‘Processed records’.
(b) Table 4B: Inward supplies from a registered supplier (reverse charge)-
Here enter the details of GSTIN-wise details of inward supplies from GST registered suppliers under reverse charge.
- Add the GSTIN, then legal name and place of supply will auto-populate, and click on the Add (+) button.

Under ‘Item details’, enter the mandatory fields – taxable value and choose the GST rate.

Click on the Add (+) button against the entry to add more rows of items or click on ‘SAVE’ to enter details with the next GSTIN.
all the entries that are successfully added will be displayed in ‘Processed records’.
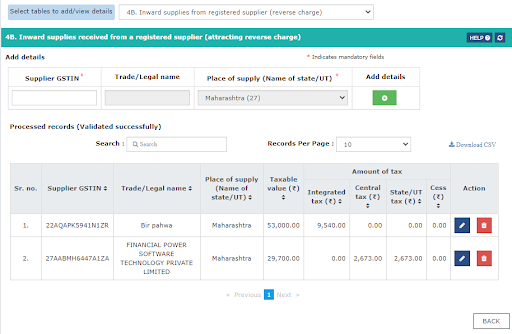
(c) Table 4C: Inward supplies from unregistered suppliers-
PAN-wise details of inward supplies made from any unregistered suppliers.
PAN is not Compulsory so you can enter the trade/legal name of such supplier. If the inward supply was liable to reverse charge, then select the checkbox and select the ‘Supply Type’ as ‘Intra-State’ or ‘Inter-State’ whichever is applicable. Click on the Add (+) button.

Under ‘Item details’, enter the mandatory fields taxable value and choose the GST rate.
Click on the Add (+) button against the entry to add more rows of items or click on ‘SAVE’ to enter details with the next PAN.
all the entries that are successfully added will be displayed in ‘Processed records’.
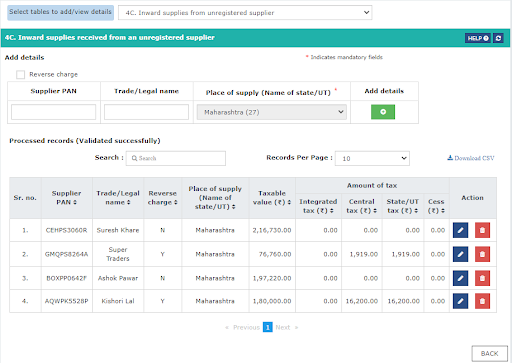
(d) Table 4D: Import of Service-
Consists of details of the Import of services on which IGST has been paid.
Click on the Add (+) button to add details of every item.

Enter the mandatory fields – taxable value and choose the GST rate.
Click on the Add (+) button against the entry to add more rows of items or click on ‘SAVE’ to enter details in the next table.
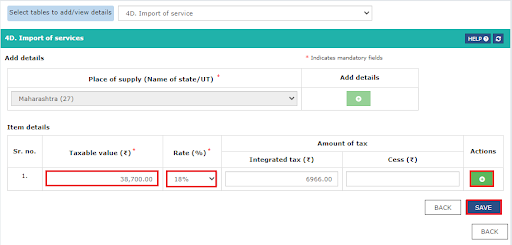
all the entries that are successfully added will be displayed in ‘Processed records’.
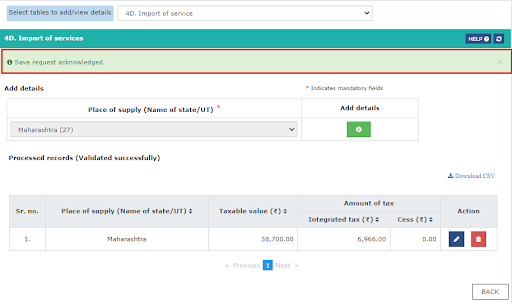
(e) Table 5: Summary of CMP-08- in this you can view the auto-drafted summary of CMP-08 statements filed for all the four quarters of the FY. It cannot be edited.
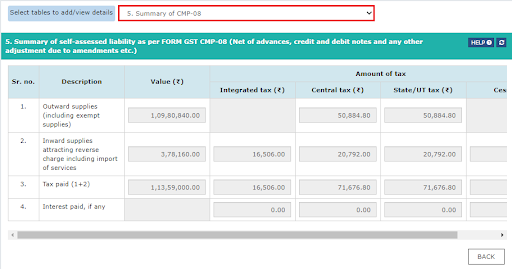
(f) Table 6: Tax rate wise outward supplies and inward supplies attracting reverse charge-
Here enter the value of outward supplies/sales in row 12 – 16 on a prefixed tax rate-wise table against the respective GST rate applicable to the composition taxpayer i.e. 0, 1, 2, 5 or 6%. Such values must be net of advances, credit- debit notes or adjustments due to amendments, etc.
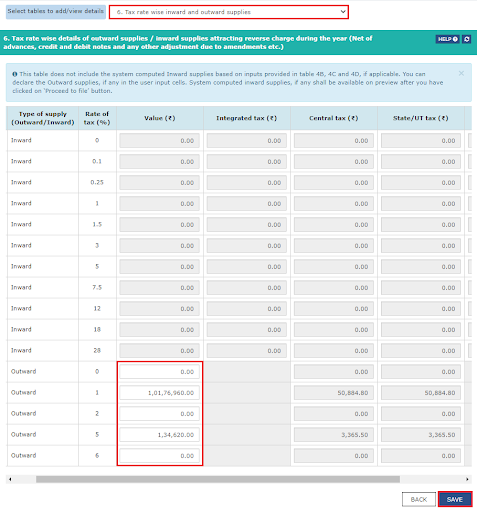
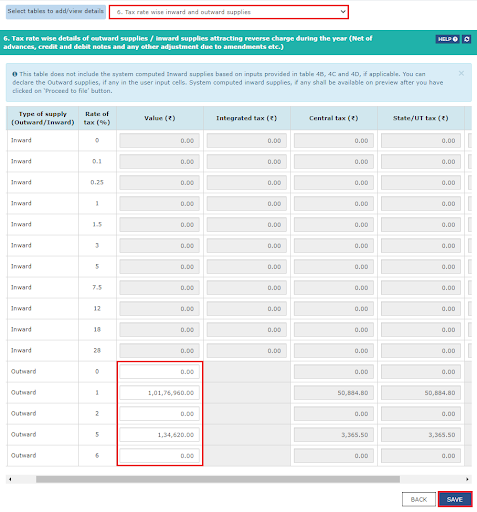
The value of inward supplies under reverse charge (auto-populated from tables 4A, 4B, and 4C) between rows 1-11 doesn’t get displayed at this stage.
Click on the ‘SAVE’ button to proceed with the next table.
(g) Table 7: TDS/TCS credit received – Here view the auto-drafted GSTIN-wise details of TDS/TCS credit received during the FY. These details cannot be edited.
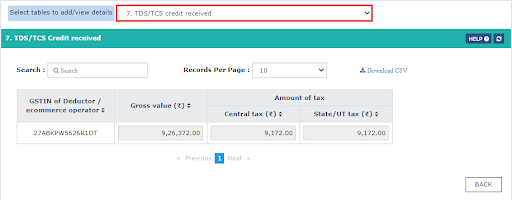
After adding the details of all the records, click on the ‘BACK’ button to navigate to the dashboard of GSTR-4.
Step 9: Click on the ‘PROCEED TO FILE’ button to preview the saved return.
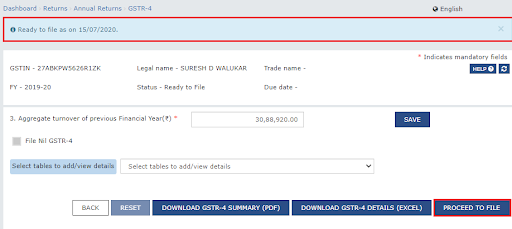
Then the status of return will change to ‘Ready to file as on (date).
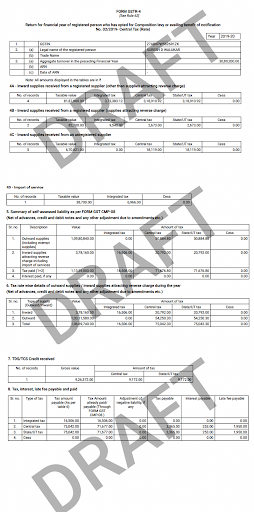
‘DOWNLOAD GSTR-4 SUMMARY (PDF)’ or ‘DOWNLOAD GSTR-4 (EXCEL)’ Click on these two buttons to save a copy of the prepared return for your review. PDF/Excel file is displayed as follows:
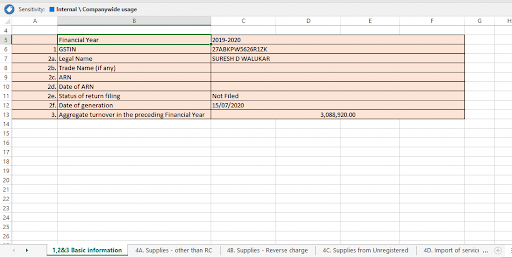
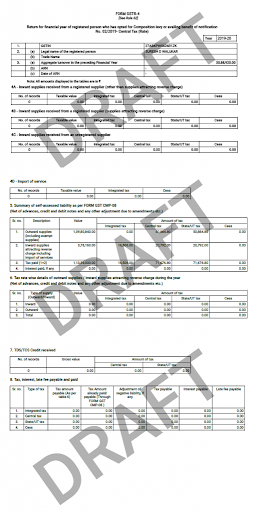
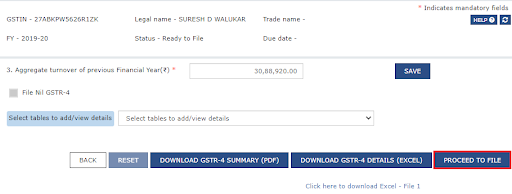
Click on the ‘PROCEED TO FILE’ button again to preview the form online and then click on the ‘CONTINUE’ button.
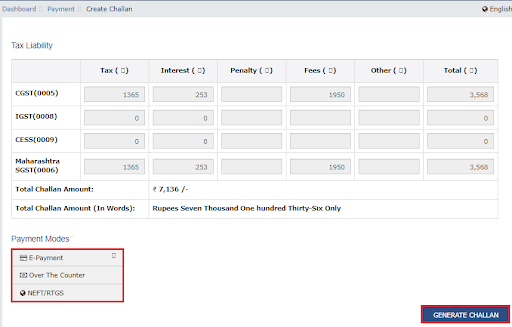
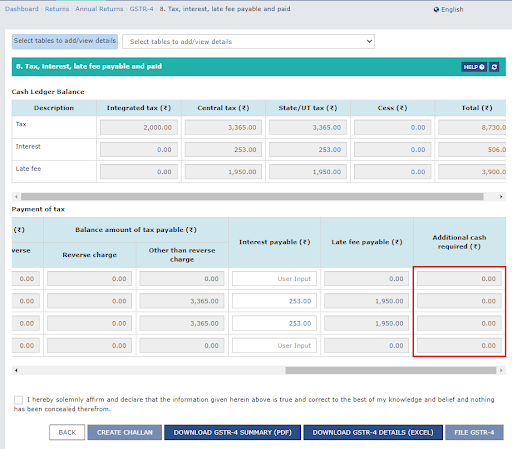
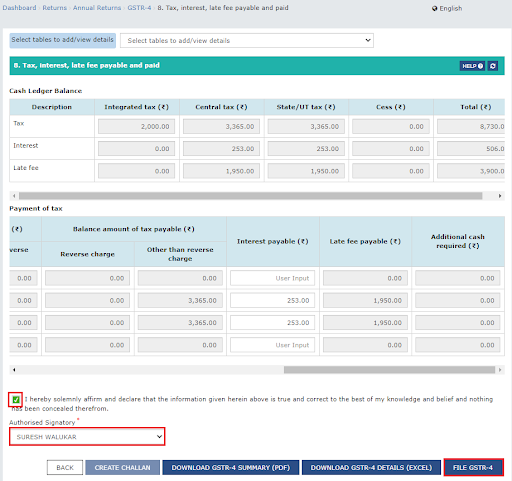
Step 10: Any tax or interest or late fee payments will be displayed on table ‘8. Tax, Interest, late fee payable and paid’ before continuing if any. The balance in the cash ledger is also shown for reference. Payment can be made in two ways:
- Click on the ‘CREATE CHALLAN’ button if cash balance in the electronic cash ledger is insufficient for full or part payment. Select the desired mode of payment such as NEFT or RTGS/Over the Counter/Net Banking and generate the challan after that make the payment.
- If the balance in the electronic cash ledger is sufficient then the cash will be adjusted from the ledger for the tax payment automatically.
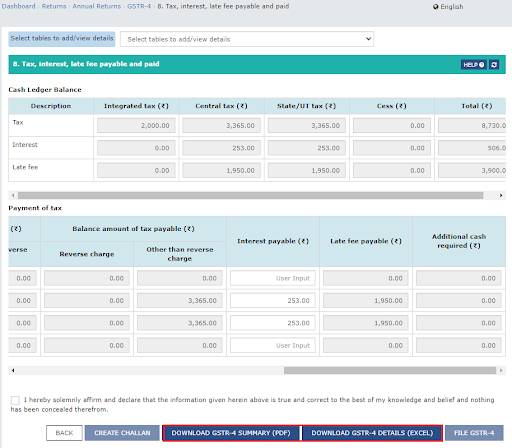
Click either on the ‘DOWNLOAD GSTR-4 SUMMARY (PDF)’ or ‘DOWNLOAD GSTR-4 (EXCEL)’ button for reviewing the updated GSTR-4 return and proceed to the next step.
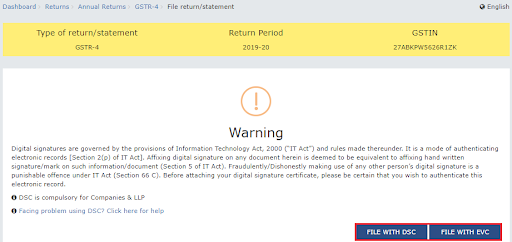
Step 11: File the GSTR-4 return using EVC or DSC.
At the bottom of the ‘tax payment’ page, select the declaration checkbox then select the authorised signatory. Click on the ‘FILE GSTR-4’ button.
Confirm by clicking ‘YES’ on a warning message and click on either of the ‘FILE WITH DSC’ or ‘FILE WITH EVC’ button displayed on the ‘File return/statement’ page.


Following is the outcome of your actions:
- The Return’s status will change to ‘Filed’.
- Application Reference Number (ARN) will get generated and displayed on the screen.
- You will receive a confirmation message on SMS and email, registered with the GST portal.
 ConsultEase Administrator
Consultant
Faridabad, India
As a Consultease Administrator, I'm responsible for the smooth administration of our portal. Reach out to me in case you need help.


